How to Use Coinbase Pro (Previously GDAX): Step-by-Step Guide

Buying and selling cryptocurrencies on Coinbase Pro (Previously GDAX) can look intimidating, but really it’s a simple process. Read through the guide below to get a full understanding of the Coinbase Pro exchange and to learn how you can trade cryptocurrencies with absolutely no fees.
Coinbase Pro is a US-based digital asset exchange that works in cooperation with Coinbase.com. Coinbase and Coinbase Pro are two of the more beginner-friendly platforms for exchanging cryptocurrencies. They are relatively simple to use but they both offer a very limited number of cryptocurrencies; 4 to be exact (Bitcoin, Bitcoin Cash, Ethereum, and Litecoin).
| Strat Trading with Coinbase Pro |
The company was created as a combined effort of financial professionals and experts in web-commerce with the goal of perfecting the online experience for retail traders.

82% of retail investor accounts lose money when trading CFDs with this provider. You should consider whether you can afford to take the high risk of losing your money
Plus500 is a FTSE 250 listed brokerage providing online trading services in CFDs, across 2,000+ securities and multiple asset classes.
eToro is a multi-asset platform which offers CFD and non CFD products. 74% of retail investor accounts lose money when trading CFDs with this provider. You should consider whether you can afford to take the high risk of losing your money.
In terms of progressing as a cryptocurrency trader/investor, most people usually start on Coinbase. Then, after feeling comfortable with the concepts and exchange rules on Coinbase, they may progress to Coinbase Pro to take advantage of the lower transaction fees. Eventually, the natural next step is to explore exchanges that offer a wider selection of altcoins, as opposed to the 4 choices available on Coinbase and Coinbase Pro.
Today, however, we’re focusing on Coinbase Pro. For those who are just starting out with using the Coinbase Pro exchange, read the following steps to quickly get set up with an account and start learning the ins and outs of this exchange. We’ll be going over the features of Coinbase Pro, how the exchange works, as well as some strategies that will help you avoid paying fees on your crypto exchanges.
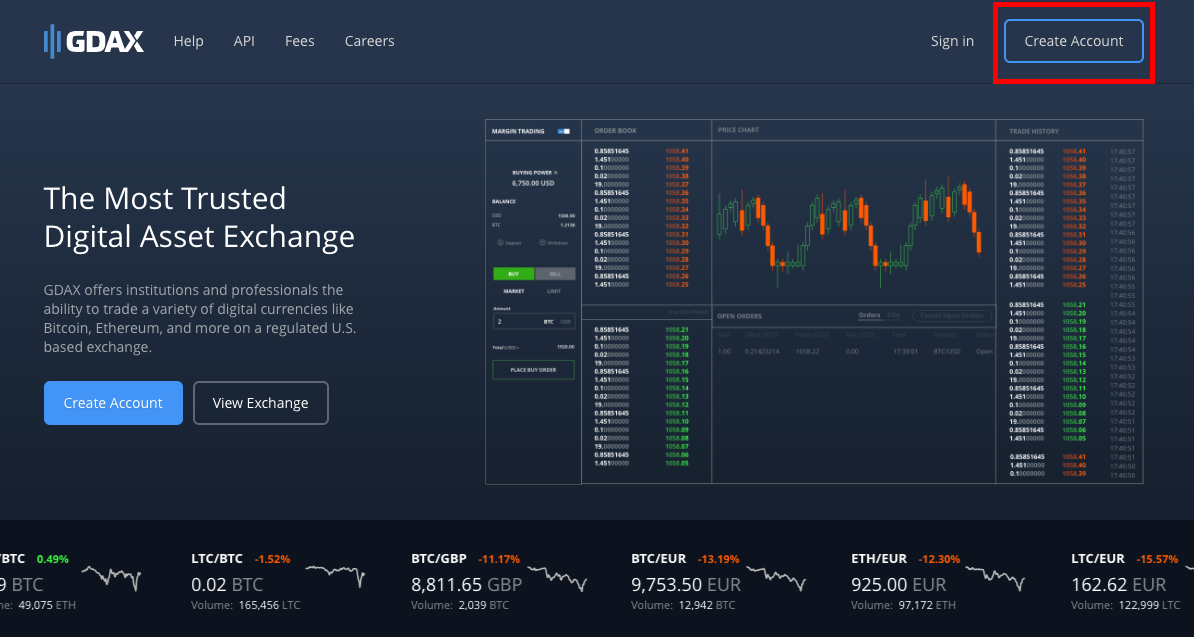
Step 1: Create an account and complete verification
You have two options for creating an account with Coinbase Pro.
- If you have a Coinbase account you can simply sign into Coinbase Pro with your Coinbase credentials. Most people prefer to use this option because of Coinbase and Coinbase Pro’s interconnectedness. Coinbase allows their users to transfer funds back and forth between Coinbase Pro and Coinbase free of charge.
- If you do not wish to have an account on Coinbase, you can create an account independently by simply selecting “Create Account” on Coinbase Pro and filling out the required information.
 Once you’ve created your account, verified your email, and agreed to the Coinbase Pro terms and conditions, you must go through a brief verification process before you can add funds and start trading. Coinbase Pro will require you to prove your identity by uploading a picture of either your Passport or Driver’s License. Afterwards, you will be asked to provide a picture of yourself and the Coinbase Pro algorithm will attempt to verify that you are… you. This may seem excessive but it’s a legitimate request that all Coinbase Pro users must complete in order to trade.
Step 2: Deposit funds to Coinbase Pro account
Once you’ve got the signup and verification out of the way, it’s time to get some money in your Coinbase Pro account.
Log in to Coinbase Pro and select the option to deposit on the left-hand side of your exchange.
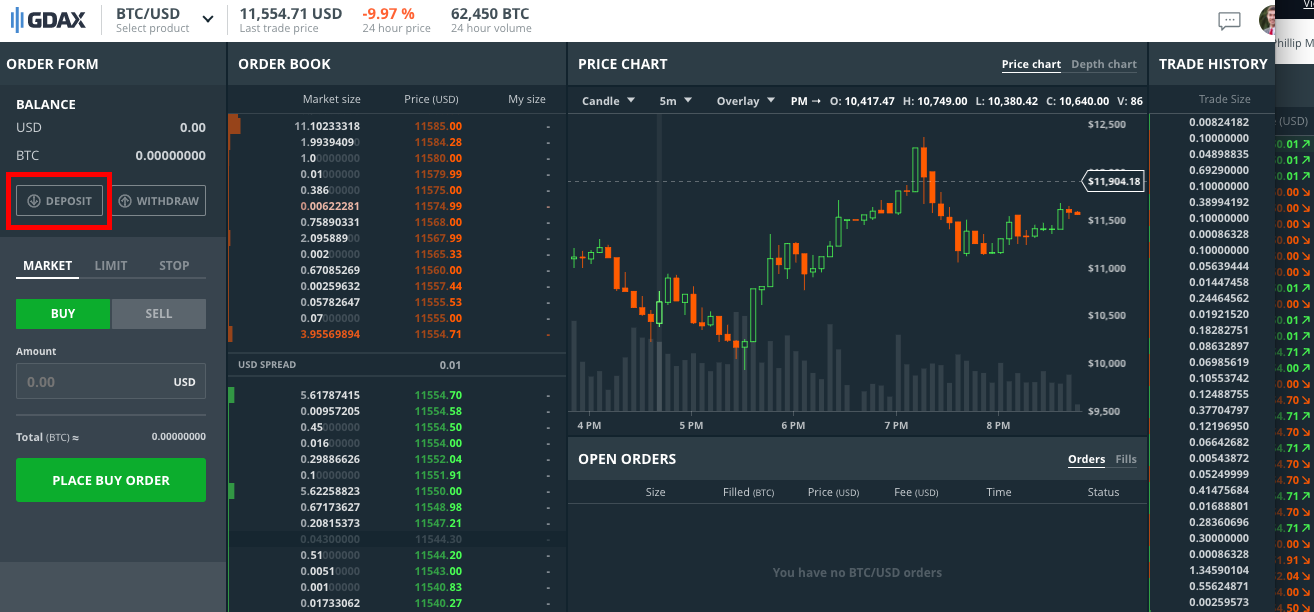
From here a window will pop-up showing you all the options that you have for adding funds to your Coinbase Pro account.
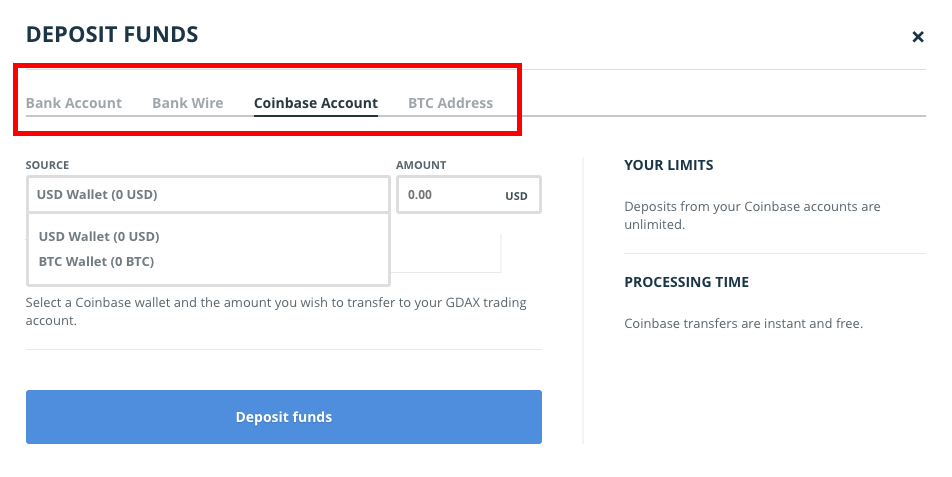 If you registered for Coinbase Pro with a Coinbase account, you have a couple of exclusive options for depositing money, both of which will be completely free.
- You can withdraw funds from your Coinbase Wallets to the Coinbase Pro exchange as shown in the image above.
- You can also transfer money to your Coinbase Pro account from the bank account that you have linked on Coinbase by selecting the “Bank Account” tab.
Users who registered for Coinbase Pro independently don’t have the option to transfer from Coinbase but still have ample ways of funding their exchange account. Those options are also presented on the “Deposit Funds” window shown above. Users can:
- attach a bank account and pull money directly into Coinbase Pro (takes 3-5 business days)
- request a wire transfer from their bank ($10 fee to wire funds TO your Coinbase Pro account, $25 fee to wire funds AWAY from your Coinbase Pro account) (usually takes 1 day)
- send Bitcoin to your Coinbase Pro wallet. The address that you send BTC to is provided in the last tab labeled “BTC Address”. (you will pay minor fees for transferring to Coinbase Pro this way).
Avoiding Fees
Coinbase and Coinbase Pro users have identified a system that lets you make cryptocurrency purchases with paying absolutely no fees. This method is for users that linked their Coinbase and Coinbase Pro accounts however independent users can still make use of the last step to place orders with no fees (once they have funds available in their Coinbase Pro account).
How to buy cryptos on Coinbase Pro with paying absolutely no money in fees:
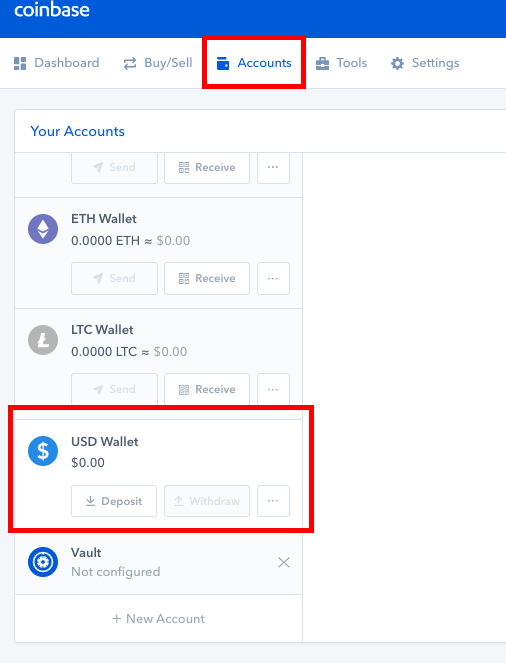
- Sign on to Coinbase.com and click on the “Accounts” tab.
- Deposit money into your USD wallet from your bank account.
- Once your funds become available on Coinbase, log on to Coinbase Pro and withdraw the USD from your Coinbase wallet. This will transfer your money into the Coinbase Pro exchange.
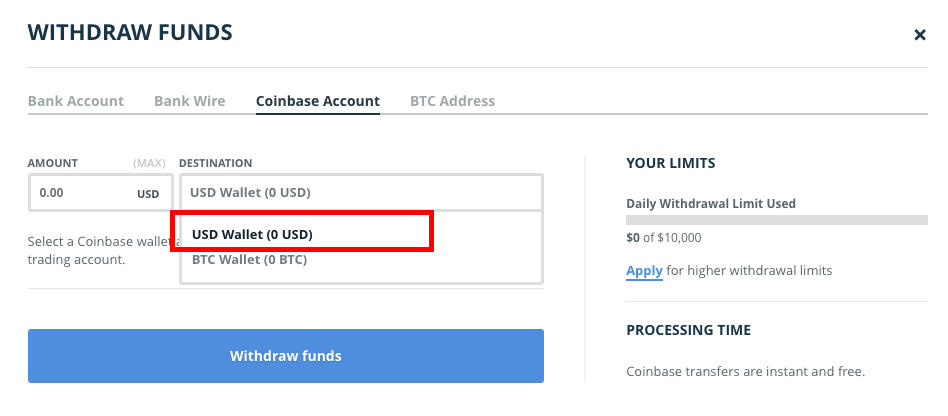 After selecting “withdraw funds”, the money becomes immediately available in Coinbase Pro for you to start purchasing cryptos. Now, there are several different types of orders that you can place to buy cryptos on Coinbase Pro. Some require a fee and others are completed free of charge. Your 3 options are:
- market order – an order that is listed at the current market price and has the highest chance of being fulfilled (usually fills in seconds)
- stop order – an order that sets the max/min that you are willing to buy or sell a coin and converts to a market order once that price is met.
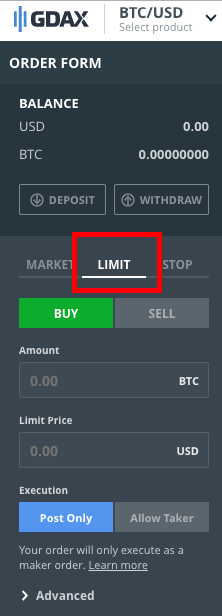
- limit order – an order that sets the max/min that you are willing to buy or sell a coin and does not settle
Market orders are fulfilled more or less immediately but Coinbase Pro charges a fee of .25% – .30% per market order. Limit orders, on the other hand, cost nothing to fulfill. We will be looking to place limit orders. This means that we will need to buy/sell our cryptos for a price slightly above/below the current market price. When the market price meets our specified price, the order will fulfill and we will receive the funds/coins in full with no fees deducted.
- Step 4 then, is to place a limit order with a reasonable price level that is likely to fulfill; usually a couple cents above or below the market price (depending on if you are selling or buying coins).
Read here for more details on the different types of orders and how you can use a limit order to take advantage of the 0% “maker” fee.Step 3: Using the Exchange
Now that you have an understanding of how to deposit funds into your Coinbase Pro account and how to place orders, it’s important to get familiar with the information that Coinbase Pro is showing you.
Trading Pairs
First, let’s take a look at the trading pairs. These are the different combinations of fiat currencies and cryptocurrencies that you can make trades on. For example, you would select ETH/BTC if you are in possession of BTC and looking to trade it for ETH, and vice versa.
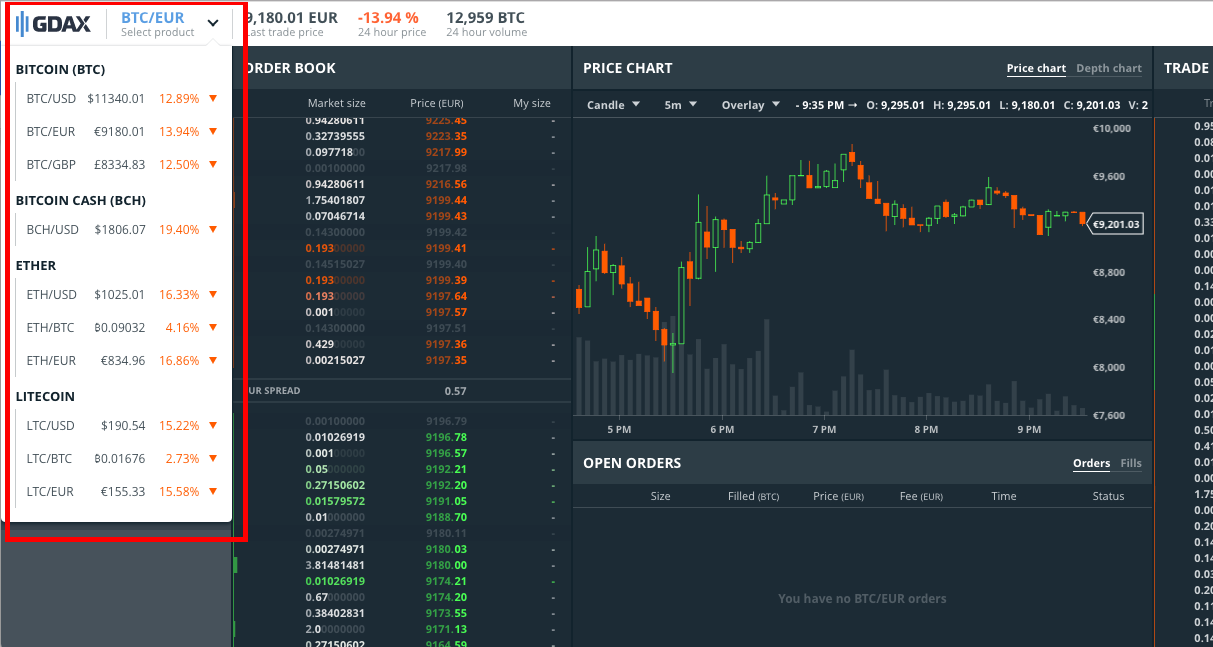
Order Book
Moving left to right, the next thing that we see is the Order Book.
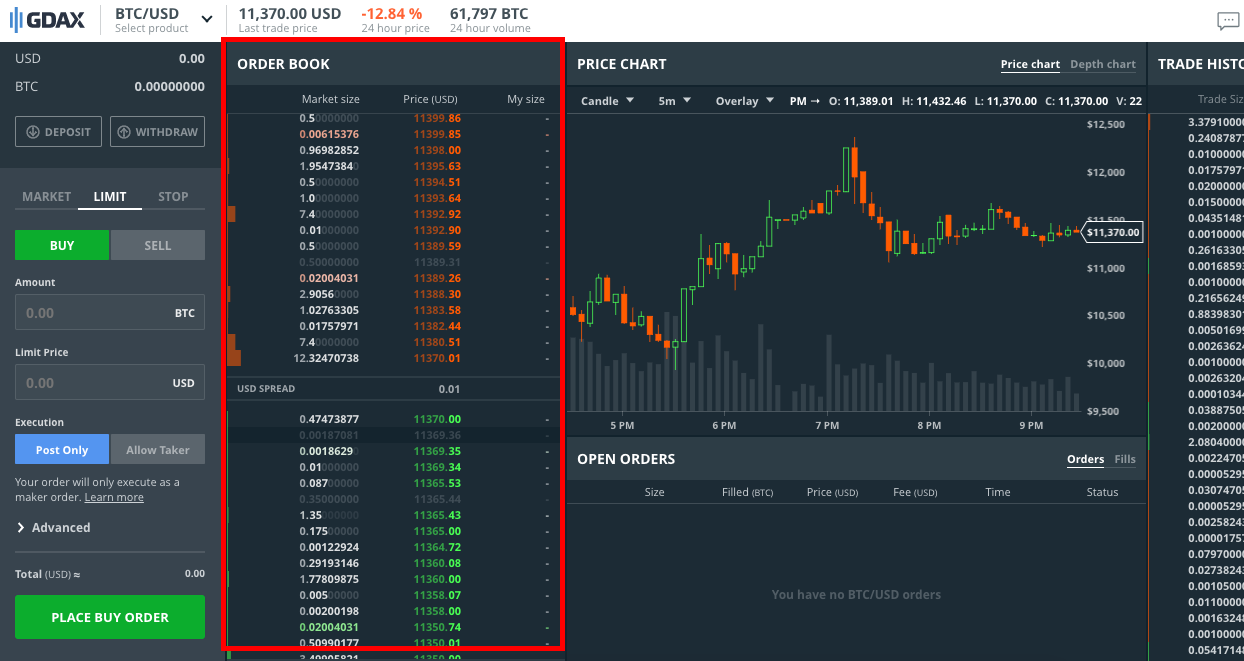
This is a live feed of all orders that have been placed on your selected trading pair. The red orders are sell orders that have not yet been fulfilled. The green orders are buy orders that have not yet been fulfilled.
“USD spread” in the middle shows the difference between the lowest sell order and the highest buy order in USD. This spread can be interpreted as a measure for a trading pair’s demand and volume. A low spread means that the trading volume is high (many people are buying and selling on this trading pair.) A high spread means that either the pair is not one that brings a lot of traffic or that the exchange itself lacks traders.
Price and Depth Charts
Next, we’ll take a look at the graphs directly to the right of the Order Book. Coinbase Pro lets you select whether you want to see the “Price Chart” or “Depth Chart” for a particular trading pair. Each chart tells you something unique.
Price Chart
 The price chart gives you a detailed illustration for a trading pair’s price progression. You have options above the data that let you toggle the time frame of the graph, the physical display of the lines, the appearance of different trend lines, etc.
Depth Chart
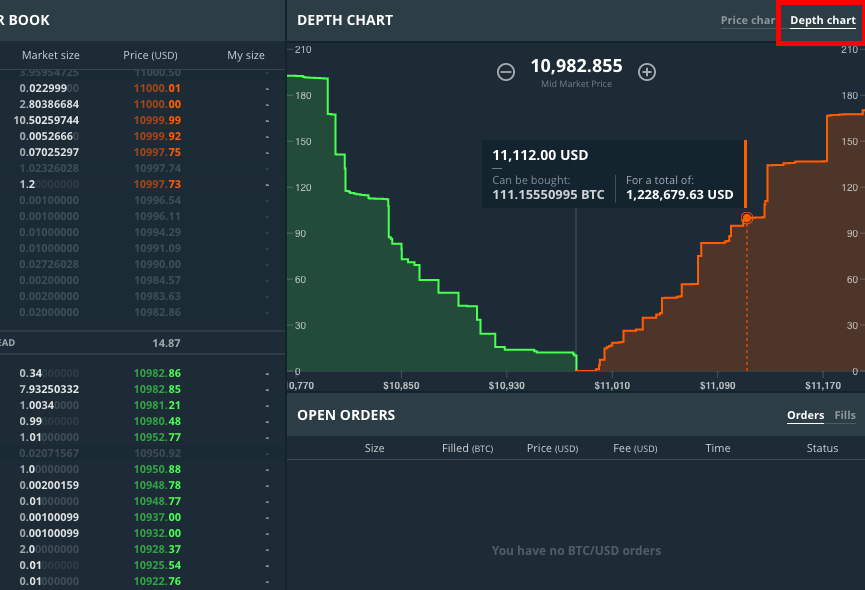 The Depth chart can be thought of as a supply/demand chart. It shows you exactly how many bitcoins are listed to be bought/sold at different price points. For example, in the screenshot above, the cursor is looking at a point where 111.1555 Bitcoins are available for sale for a total price of 1,228,679.63 USD.
Open Orders and Trade History
Finally, we’ll look at the “Open Orders” and “Trade History” sections.
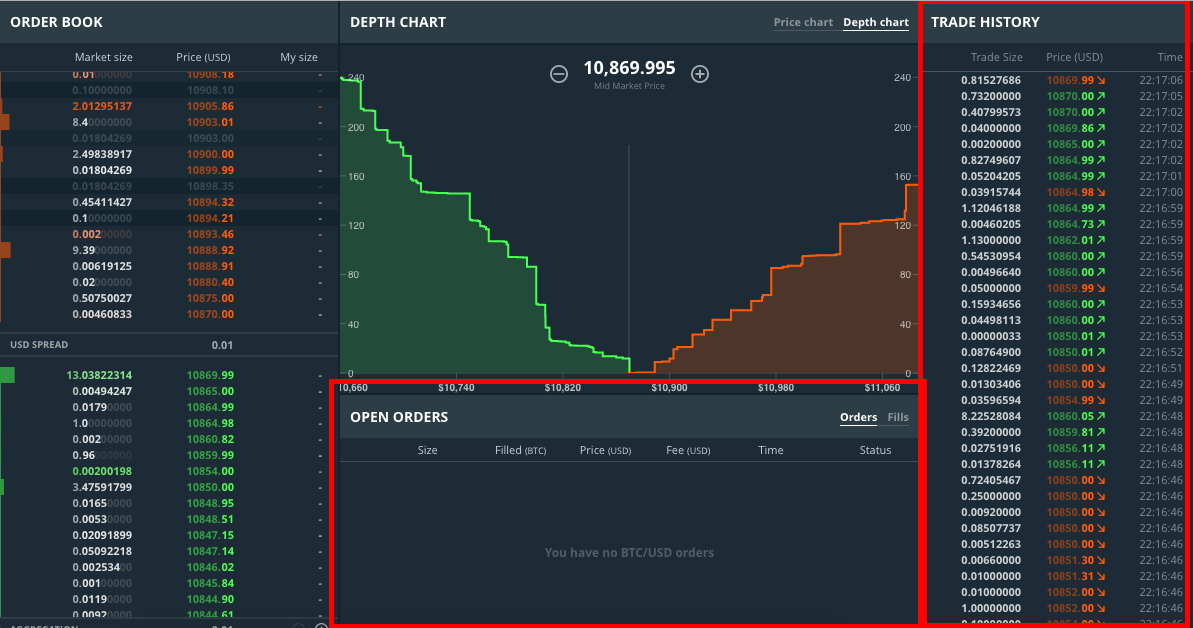
Anytime you place an order that is not immediately fulfilled, like a limit or stop order, it shows up in the “open orders” section. Your orders will sit here until completed or until you manually cancel them. Market orders are fulfilled very quickly but they too will appear in the “open orders” tab for a brief moment.
The Trade history simply shows the most recent orders that have been fulfilled by the exchange.
Final Thoughts
Every section of the Coinbase Pro exchange is constantly updating and shifting, giving it that intimidating analytical display. Really though the metrics shown are relatively basic and provide you with concrete information on the current state of your cryptocurrencies.
As mentioned, Coinbase Pro is a beginner-friendly exchange given that it only supports a handful of trading pairs. Thankfully, this is about as complicated as cryptocurrency exchanges will get in terms of data and appearance. Most other exchanges display this same level of information if not less.
Many people tend to eventually move away from Coinbase Pro because of those limited trading pairs. Coinbase Pro is something of a stepping stone to trading on an exchange with more altcoins options, such as Binance. Once you’ve mastered trading on Coinbase Pro, you should be well-equipped to trade on those other exchanges. Always look into the fees associated with each exchange so that you can find the least costly (or even free) route to trading cryptos.